

.avif)
Winter break never feels long enough, and yet it’s the perfect amount of time to forget how to do the routine tasks you used to do every day before the break. Here are eight things we know you know how to do, but maybe a reminder wouldn’t be so bad either.
How Do I Log In?
Let’s start at the beginning. To do anything in your apps, you need to log in first.
- Head up to the upper right-hand corner of the screen and click the PBIS Applications Login link.
- Enter your email address in the Username field and your password in the Password field. If you don’t remember your password, click Forgot Password to reset it.
- Click Login.
- The applications appear on the left-hand side of the black bar. Click the one you want to use. If you only have access to SWIS, you the login process will redirect you into SWIS automatically.
How Do I Pay My Invoice?
If you come back from break and your subscription fees haven’t been paid, there are several ways to pay your invoice, including online. To pay your subscription fees with a credit card online:
- Click on the Help menu at the top of the PBISApps homepage.
- Click Pay Invoice Online.
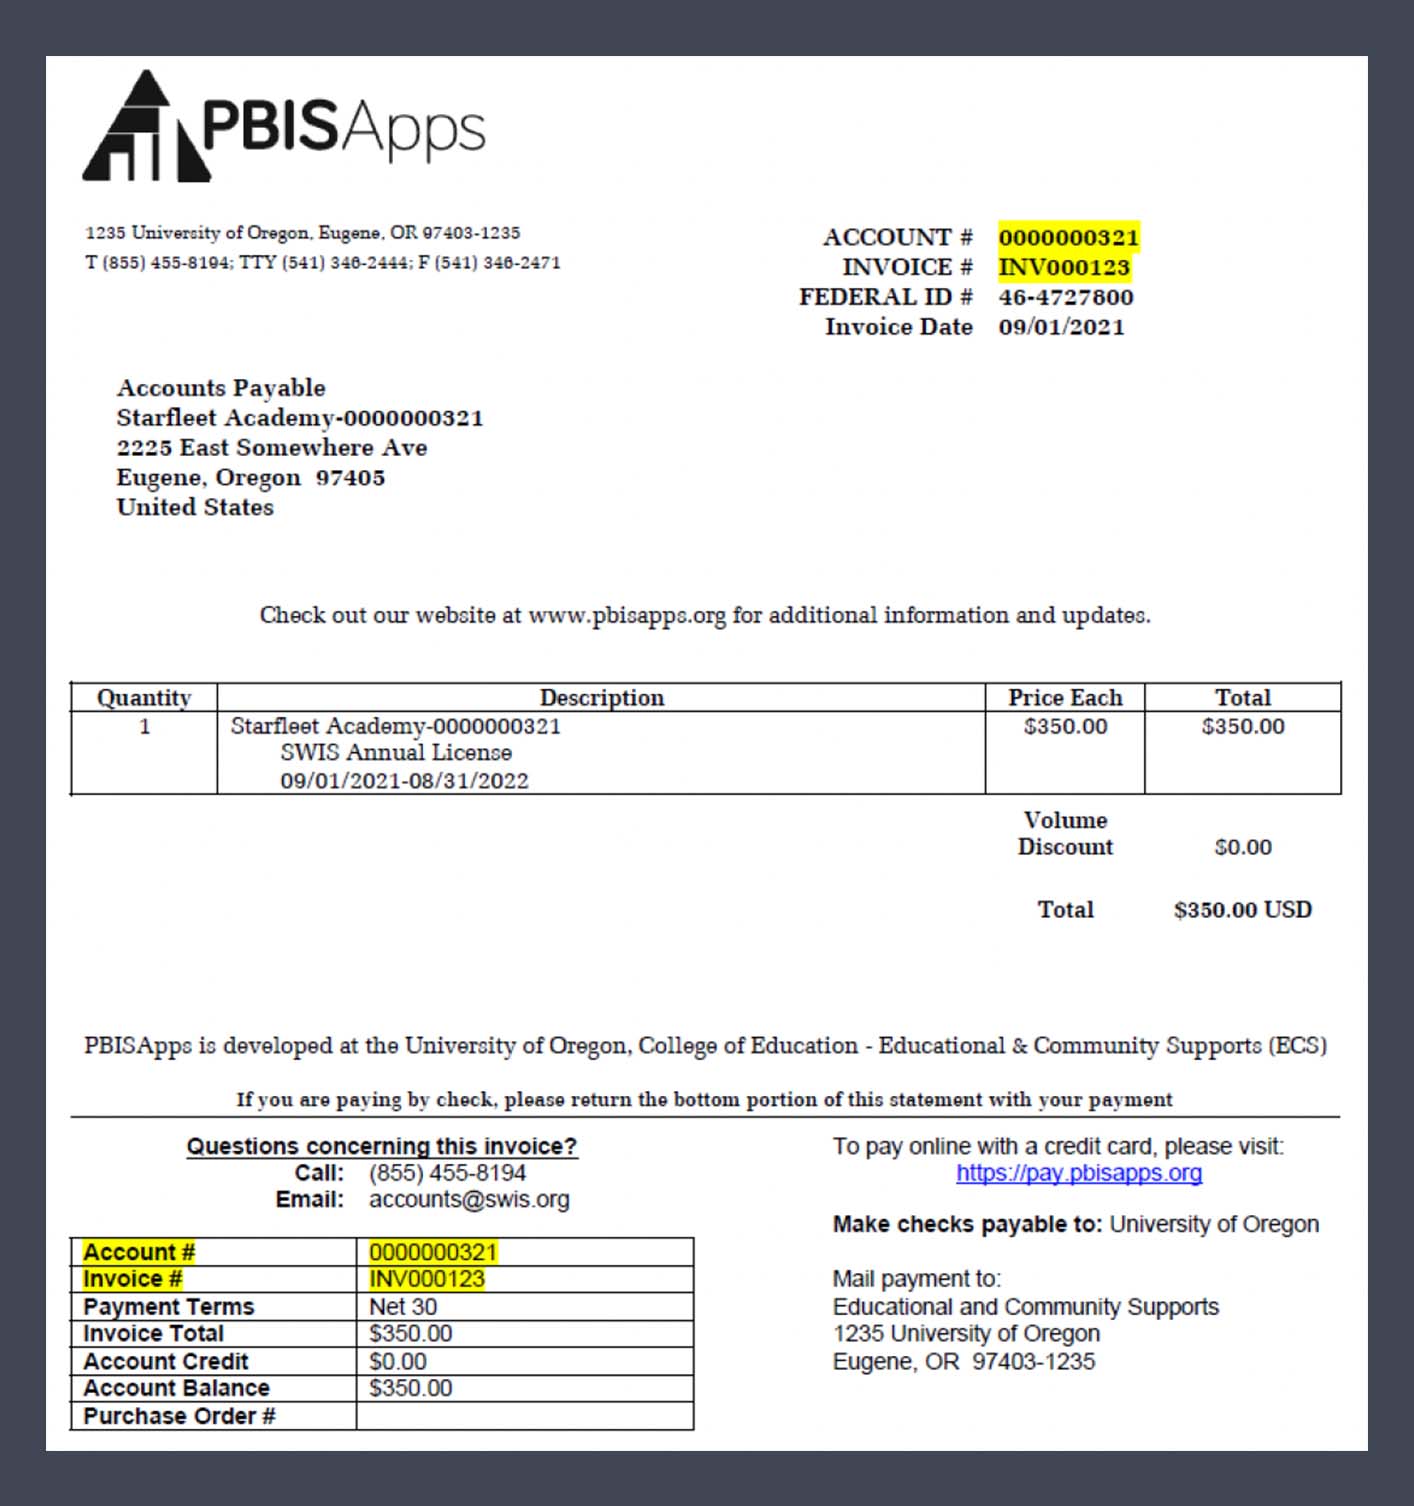
- Enter your invoice number in the Invoice Number field and your account number in the Account Number field. Both numbers are required. You can find them on the lower left-hand or upper right-hand corner of your invoice.
- Click Submit.
- An electronic copy of your invoice displays to verify the expected amount. Scroll down to the bottom of the page and click PayInvoice.
- Enter all credit card information and click Pay.
- You can also pay any subscription fee with a check. Make your check payable to University of Oregon and send it to:
Educational and Community Supports
1235 University of Oregon
Eugene, OR 97403
If you need a copy of your invoice, send an email to our accounts team and they’d be happy to send you an electronic copy. Their contact information is in the Help menu on the PBISApps homepage.
How Do I Open a Survey?
January is a good time to take a survey or two to check in on how things are going. That means opening some survey windows. Ask your PBIS Assessment Coordinator to:
- Go to the Surveys Menu in PBIS Assessment and click Open Survey.
- Select the name of the organization from the boxes displayed.
- Select the survey to open from the Survey drop-down list.
- Type an Open Date and Close Date in their respective fields.
- Click Open Survey.
How Do I Take a Survey?
If you’re taking a single-response survey like the Tiered Fidelity Inventory (TFI), log into PBIS Assessment:
- Click the survey’s name of the from the Open Survey Windows section.
- Locate the name of your school from the list and click the Take Survey link next to it.
- Enter your responses on each page and click Submit Survey at the end to save your responses.
If you’re taking a multi-response survey like the School Climate Survey (SCS), your school’s coordinator will send a link to the survey to everyone who can take it. If you are the coordinator and you don’t know where to get that link, log into PBIS Assessment:
- Click the survey’s name from the Open Survey Windows section.
- Locate the name of the school needing to take the survey and click the word Link in that row under the Availability column.
- Click the Copy URL button to copy the link and then paste it into an email to send out to the folks needing to take the survey.
How Do I Extend a Survey Window?
Did you have a survey close over the break and no one took it? Did you need to reopen a climate survey because there are still some folks who need to submit a response? All you need to do is extend your survey window. Log into PBIS Assessment:
- Click the survey’s name from the Closed Survey Windows section.
- Locate the name of the school needing to extend their survey window and check the box next to that school’s name.
- Click the Change Dates for Selected Surveys button.
- Update the dates. Updating the close date to today’s date or later extends the survey window to give more time to take the survey.
- Click Update to save the changes.
- The updated survey window should now appear in the Open Survey Windows section with links to take the survey.
How Do I Enter a Referral?
Referral entry happens in SWIS, so the first thing to do is log into SWIS. Once you’re there:
- Click the Add Referral screen at the top of the SWIS Dashboard.
- Enter the required information on the screen.
- Click Save as Complete or Send for Review depending on your access level and whether your school uses referral workflows.
If your school does utilize referral workflows and you are a referral entry only user, once you log in, SWIS automatically drops you into the referral entry workspace.
How Do I Know Who My SWIS Facilitator Is and How to Contact Them?
Your school’s SWIS Suite facilitator is there to help answer questions and provide training related to the applications, as well as troubleshoot any problems you find along the way. If you lose their contact information, don’t worry; you can find it inside the SWIS Suite. Here’s how.
SWIS Suite Facilitator Contact Information:
- Log into the SWIS Suite.
- Click on the Tools menu and select School Settings.
- Click the Contact Information menu under the School Profile settings.
- Your facilitator’s contact information is listed here.
How Do I Add a Referral Entry Only User?
Anyone with SWIS Admin access to your SWIS account can setup referral entry only users for your school. If that’s you (or you know who that is), here is what to do:
- Click Tools and then select User Management.
- Select the name of the person who needs referral entry only access by checking the box next to their name. If there are multiple people to add, check the boxes next to their names. You’ll need to go one page at a time.
- Click the Send Invitation button at the top-left corner of the window.
- Make sure each person has an email address and then click the Send Invitation button.
- Each person will get an email with instructions on how to complete the setup process and what it means to be a referral entry only user.
How Do I Add a New Student or Update a Current One?
There are a couple of ways to add to or otherwise update your student list.
The Manual Way to Update Student Records
You can make updates manually by clicking on Student List under the Tools Menu. If you have a couple of students to add or update, this is the most efficient way to go. From the Student List workspace in Person Management there are several edits you can make:
- Click the Add button to add a new student.
- Select a student from the list and click the Delete button to delete the record.
- Double-click any student name to edit any student record on the list.
The Person Export + Person Import Way to Update Student Records
If you have several new students arriving, or moving to distance learning, or even leaving your school, using Person Export and then Person Import will make efficient work of all those updates. The first step is to enable Person Import in School Settings. That will enable the Person Export feature, too! From there, head back to the Tools menu and select Person Import.
- Click the Export Student List button to export your roster.
- Choose which students to include in your export. We recommend including both Active and Inactive students.
- Click Export.
- Open the file and start updating student information. If you have new students to add, enter their information in the appropriate columns.
- Save the file.
- Head back to Person Import and import the file you just saved.